Help Center
FAQ's
Baja Racing Gear has mostly an online presence. We do attend all Arizona Off-Road Promotions races and vend on site.
We are a PCI dealer. We send (or have you send) repairs directly to PCI for repair.
Fill out this form, contact us for questions.
Baja Racing Gear ships orders Monday - Friday excluding Holidays. We strive to ship in stock orders that are placed by 2:00 PM PST the same day. Some orders require customization or technician tuning and this extra special care may take additional time to process. Items often requiring 1-2 business days are Helmets, Radios with programming and Satcomm. If you need something rushed or shipped same day, please call us and we will try our hardest to accommodate. If anything is out of stock, we will call or email to notify you. Once your items are ready for shipping, your order will ship with the shipping method selected at checkout.
Holidays, Trade Shows and online specials can delay orders as well. If you need an item shipped same day, please enter some notes in your order or call us to confirm.
Deliveries occur Monday - Friday following the Fed Ex Holiday schedule. If Monday is a Holiday and your order ships Two Day Air on Friday, your delivery date will be Wednesday.
Please note that Baja Racing Gear does not ship to unrelated businesses, hotels, or freight forwarders. If you need a shipment to one of those addresses, please contact us.
We cannot ship to PO Boxes. For fastest processing, ship to a physical address that matches your credit card billing address.
We will gladly return most items within 30 days of purchase. Returns may be subject to restocking fees to cover any credit card fees, shipping and re-packaging. These items are not returnable or refundable:
• Any item purchased over 30 days.
• Any DVD, Software or video that has been opened.
• Any item that is not in its original, new, unused condition, missing parts or damaged by anything other than shipping.
• If an item was damaged during shipping, you must retain all packaging, and send a photo to bajaracinggear@gmail.com for a prompt Fed Ex investigation and refund/reshipment within 5 days of receiving your order.
• All special order and modified items are final sale.
• GPS and Satcomm units are final sale.
• Labor, Service and activation fees are non refundable.
We do not ship internationally. There are other services you can use for this.
Baja Racing Gear carries several Billet brackets for our intercoms, radios, RaceAir, GPS, antenna and other items. This guide will help you determine what size you need.
Can Am X3 Perimeter Bars 1.85"
Can Am X3 Rear Harness Bar 2.5" (On the 4 seater the front passenger harness bar is 1.85")
Can Am Maverick and Commander 2"
Polaris Top Cross bars and Perimeter bars 1.75"
Polaris Rear harness and bumper crossbar 1.5" (Some models will have 1.75")
Yamaha YXZ Cage 1.75"
Yamaha YXZ Crossbars 1.5"
Yamaha Rhino Perimeter 1.75"
Yamaha Rhino Top Crossbars 1.5"
Arctic Cat Wildcat 1.75"
Honda Big Red, Pioneer 500 and 700 1.625"
Honda Pioneer 1000 1.75"
Kawasaki Teryx Perimeter 1.875" / Top Crossbars 1.7"
Radios:
2 years on Kenwood and Icom radio mainframes (1 year parts and accessories)
1 year on Baofeng radios (6 months on parts and accessories)
PCI intercom systems (including cables, headsets, PTTs):
1 year manufacturer defects in materials and worksmanship
Lowrance GPS:
2 years on HDS series devices
1 year on Elite TI series devices
RaceAir (including Boost):
1 year manufacturer defects in materials and worksmanship
Helmets (1 year on all PCI custom wiring/RaceAir)
HJC DOT – 3 year defects in materials and workmanship
HJC SA-rated - 1 year defects in materials and workmanship
Impact - 1 year defects in materials and workmanship
Pyrotect - 1 year defects in materials and workmanship
Klim - 5 years defects in materials and workmanship
Bob Steinberger, otherwise known as The Weatherman, put communications in the vehicles of Bill Stroppe, Joe MacPherson and Walker Evans in 1972. At the 1974 Mint 400, he sent up three weather balloons with five hundred feet of coax attached and the first successful radio relay from a pit was made. It is believed that it was Joe MacPherson who couldn't remember his name, so he dubbed him "Weatherman" on the radio. The rest is history and Bob's iconic status has been reached through nearly half a century of work with the communications company he founded, PCI Race Radios.
With over 40 years of experience, PCI Race Radios literally pioneered the Intercoms, Helmet, Radios and GPS units used today. Years of development and our own personal racing experience has helped us to design the best quality products available. Each and every product is tested by our R&D department to ensure that it can be used in the all different terrains and weather. After all, we are racers as well! All our products are made by the racers for the racers!
PCI manufacturers all of our intercoms right here in the USA. Buying from PCI also means you're buying manufacturer direct for all Headsets, Helmet wiring kits, cables and accessories.
We directly represent and distribute several large Manufacturers like Icom, Kenwood, Lowrance, Impact, HJC and others. We don't just two-step these products (or even three step like some of our competitors) but we work together with these manufacturers day in and day out to help design the highest quality components in racing. Recently, we designed an ear cup specifically for HJC. Check out this case study from Icom America, showing our direct involvement in testing two-way radios for the market.
No other company contibutes more to product development and design than PCI. Time isn't all we contribute to this industry - PCI is a huge supporter of all land use organizations that help keep our desert recreational and racing areas open. We've been an ASA, CORVA, ORBA, BRC and others.
We also do a great deal of sanctioning body support. As the official Radio of SCORE, MORE, SNORE, LOORRS, Ultra 4, KOH, AVE, WE ROCK and AZOP - we support these sanctioning bodies with equipment and training to bring you a fun, safe, efficient race. Scott "Weatherman" Steinberger carries on his father's legacy at every SCORE race providing the "Weatherman" Radio Relay.
Last but not least - our trackside and on site support. No other company can compete with our experience and inventory at the races. You can count on friendly, efficient service trackside at most races for service and sales. Talk about backing up your product - need something at the race track? We're there to help!
Click here for free downloads of popular racing and recreational areas.
Some Lowrance Software versions do not work with popular .lcm mapping files. If your GPS doesn't read a mapping card, inserting a card slows the GPS, freezes it or constantly restarts it - check your software version.
For compatibility with all mapping cards, we recommend the following versions of software:
Globalmap: Any
Trophy: 1.0
Elite 5m Baja: Any
Elite 7 TI: 18.2 or 5.0
Elite 5 TI: 18.2 or 5.0
Elite Ti2 19.1
HDS Gen 2: 2.5
HDS Gen 1: Any
HDS Gen 3: 18.2 or 7.0
Elite 7 HD: 4.0
After downloading the file, copy the unzipped files onto a blank SD card (not the card with the mapping). Power off the GPS, place the card into the GPS unit and turn the GPS on. Call us if you need additional help.
HDS units are compatible with all previous NMEA 2000 capable units. However, the network will now be powered by a power node (see diagram) and not through the display unit. The power node is part #119-75 and can be purchased here.

Some Lowrance Software versions do not work with popular .lcm mapping files. If your GPS doesn't read a mapping card, inserting a card slows the GPS, freezes it or constantly restarts it - check your software version.
For compatibility with all mapping cards, we recommend the following versions of software:
Globalmap: Any
Trophy: 1.0
Elite 5m Baja: Any
Elite 7 TI: 18.2 or 5.0
Elite 5 TI: 18.2 or 5.0
HDS Gen 2: 2.5
HDS Gen 1: Any
HDS Gen 3: 18.2 or 7.0
HDS Carbon: 18.2 or 4.0
Elite 7 HD: 4.0
After downloading the file, copy the unzipped files onto a blank SD card (not the card with the mapping). Power off the GPS, place the card into the GPS unit and turn the GPS on. Call us if you need additional help.
PCI modifies all of our Point 1 Antenna units to remove some boating features and keep your GPS heading the right way. If you purchased your antenna somewhere else and you have an HDS, you can manually turn these settings off by following these instructions. If you are using a Point 1 antenna with a Global map GPS and purchased your antenna somewhere else, you will need to send the antenna in or bring it to us at a race to have it modified.
We recommend using the Insight Planner software from Lowrance.
Ever been in the back seat and wished you could see the GPS? Want to type up waypoints in the GPS but work from a keyboard in your lap vs GPS on the dash out of arms reach?
The Lowrance HDS Gen 3 has wifi connection capability to you phone or tablet. Your phone will show the image on the screen - a tablet like an ipad will allow full control of the screen in addition to the image.
Download the Go Free app on your tablet or phone. You can connect multiple devices at the same time.
To connect, we've created this helpful list of instructions:
- Download the Go Free app on your tablet or phone.
- On your HDS Gen 3, select Pages > Settings > (Scroll down to) Wireless > Wireless Devices. A pop up will appear showing the "name" of the GPS unit. Example: HDS-9 Gen3 120e.
- Select the GPS Name (the grey area). Another screen will open with more information, find the Network Key.
- On your mobile device, open wi-fi connections. Select your GPS from the list of devices. The password is the Network key from step #2.
- Open the Lowrance Go Free App on your Mobile Device. Select your GPS.
- The GPS will ask you to allow access, select yes.
We've run across a few GPS units with the "Error Parsing Waypoint" message when trying to import a .usr file. By updating to the latest software version, you can eliminate this problem. If a software download isn't possible in the field, a quick option is to convert the file to a GPX file instead of .USR. Keep in mind converting to GPX may remove some features like icon selections.
To solve many GPS issues, we recommend the following versions of software:
Elite 7 TI: 18.2 or 5.0
Elite 5 TI: 18.2 or 5.0
HDS Gen 2: 2.5
HDS Gen 1: Any
HDS Gen 3: 18.2 or 7.0
HDS Carbon: 18.2 or 4.0
After downloading the file, copy the unzipped files onto a blank SD card (not the card with the mapping). Power off the GPS, place the card into the GPS unit and turn the GPS on. Call us if you need additional help.
We have found the best way to create a trail on the computer is to use Google Earth.
- • Download and install Google Earth
- • Right Click on My Places and create a new folder
- • Click on the "New Path" Icon on the menu bar.
- • Start at the beginning of your trail and keep clicking to create points along the path. The more clicks, the higher the resolution. The fewer clicks, the straighter the line in between each point.
- • Change the name of your path and click ok.
- Find the new path you created in My Places (hopefully in that new folder you created)
- • Right click on the entire folder if multiple paths or just the one path if that's all you want to export and left click on Save Place As.
- • Name your file, select a location to save and change file type to .Kml
- • Go to http://www.gpsvisualizer.com/gpsbabel/
- • Type of GPS Data you want to convert: Tracks
- • Input file Format: Google Earth (Keyhole) Markup Langauge
- • Output file format: Lowrance USR if using an older GPS, GPX XML if using a newer touch screen GPS
- • Upload your file and click on convert the file.
- • Click on your file to download.
- • Save to a chip and load/import into your GPS!
- • Cool tip: Check out the section under Create Graphics with GPS Visualizer. If you click on one of those links it will show your trail in Google Maps, Earth or as a .jpg image.
Check out our helpful Youtube Instructional Video
Developed over 30 years ago, PCI wiring is the standard in Off-Road communications. PCI helmets and headsets are compatible with what competitors call "off-road."
IMSA and Peltor conductors look the same, but the pin configuration is different.
Nascar looks different with a 3 pin conductor.
We sell adapters to convert IMSA, Peltor and Nascar items to PCI here.
For a better understanding of the pin configurations or to wire something on your own, click here for an explanation of conductor pin configurations.
DOT standard are set by the US Federal Government for on road use. SNELL standards are much higher and are normally required by racing sanctioning bodies. Most Off-Road Sanctioning Bodies require SA Rated helmets. SA is the Automotive Rating, while M is the Motorcycle Rating. The SA Helmet requires a flammability test, has a narrower field of vision and includes a rollbar multi impact test while the M helmet does not.
We recommend replacing your helmet every 5 years. If your helmet has been involved in a serious impact, we also recommend replacing it. Most Off-Road sanctioning bodies allow the current SNELL year and the previous making SA 2010 and SA 2015 legal. An SA 2015 Helmet should be "legal" until the 2021 Rule books come out.
DOT is the Department of Transportation. The SNELL Memorial Foundation is a not-for-profit organization that sets tougher testing guidelines for helmets. For more information and Impact Test Comparison Tables, visit the SNELL website.
Never buy a used helmet or borrow someone else’s helmet. Over time the protective foam in helmets will adjust to the contours of a user’s head. A used or borrowed helmet may not offer as much protection as a new helmet.
Please remember: Helmets will "break in" with use. It is important that the helmet fits as tight as one can comfortably withstand to wear.
Wearing the wrong size helmet can increase your risk of serious injury or death in an accident. A helmet that is too large for your head may be dislodged or knocked off in an accident. To select the right size helmet for your head, follow these instructions:
- Measure your head. Wrap a tape measure around your head about one inch (2.5 cm) above your eyebrows.
- Use the sizing chart to select the helmet size that corresponds most closely to your head measurement. If your head size falls between two helmet sizes, try on the larger helmet first and then the smaller size.
- Try on the helmet by grasping both chin straps to pull the helmet completely onto your head, ensuring that the top of your head is in contact with the top of the helmet interior.
- Check for a proper fit. To make sure your helmet is the right size, check that the helmet inner lining fits snugly around your head, The top pad presses firmly on your head, The cheek pads contact your cheeks, and there is no space around your brow under the inner lining. Test this by trying to insert your fingers. If the helmet does not fit snugly, try on a smaller size.
- Test the helmet fit by placing your hands on each side of the helmet. While holding your head as motionless as possible, try rotating your helmet from left to right then up and down. If you can feel the helmet padding sliding on your head, it is too big, try a size smaller. You should feel the helmet move the skin on your head and face as you try to move the helmet.
- Fasten the retention system (chin strap) as tight as possible under your jaw without causing pain. There must be no slack in the strap, and the strap must be tight up against your jaw.
- Test the retention system (chin strap). Put your hands on the back of the helmet and try to push the helmet off by rotating it forward. Put your hands on the front of the helmet above your forehead (or on the chin guard) and try to push the helmet off by rotating backward. If helmet comes off, try another size or another model or brand. Repeat steps 3 through 8 until you find a helmet that fits your head snugly and securely.
HJC AR-10 III Sizing:
| SIZE | CENTIMETER | HAT SIZE | INCHES |
|---|---|---|---|
| XS | 54-55 | 6 3/4 – 6 7/8 | 21 1/4 – 21 5/8 |
| S | 56-57 | 7 – 7 1/8 | 22 – 22 1/2 |
| M | 58-59 | 7 1/4 – 7 3/8 | 22 7/8 – 23 1/4 |
| L | 60-61 | 7 1/2 – 7 5/8 | 23 5/8 – 24 |
| XL | 62-63 | 7 3/4 – 7 7/8 | 24 3/8 – 24 3/4 |
| XXL | 64-65 | 8 – 8 1/8 | 25 1/4 – 25 5/8 |
Impact Sizing:

Klim Sizing:
| SIZE | CENTIMETER |
|---|---|
| S | 55-56 |
| M | 57-58 |
| L | 59-60 |
| XL | 61-62 |
| XXL | 63-64 |
HJC CS-R3 Sizing:
| SIZE | CENTIMETER | HAT SIZE | INCHES |
|---|---|---|---|
| XS | 54-55 | 6 5/8 - 6 3/4 | 20 7/8 - 21 1/4 |
| S | 55-56 | 6 7/8 - 7 | 21 5/8 - 22 |
| M | 57-58 | 7 1/8 - 7 1/4 | 22 1/2 - 22 7/8 |
| L | 58-59 | 7 3/8 - 7 1/2 | 23 1/4 - 23 5/8 |
| XL | 60-61 | 7 5/8 - 7 3/4 | 24 - 24 3/8 |
| XXL | 62-63 | 7 7/8 - 8 | 24 3/4 - 25 1/4 |
HJC CL-17 Sizing:
| SIZE | CENTIMETER | HAT SIZE | INCHES |
|---|---|---|---|
| 3XL | 65-66 | 8 1/8 - 8 1/4 | 25 5/8 - 26 |
| 4XL | 67-68 | 8 3/8 - 8 1/2 | 26 3/8 - 26 3/4 |
| 5XL | 69-70 | 8 3/4 | 27 1/4 - 27 5/8 |
HJC CL-Y Youth Helmet Sizing:
| SIZE | CENTIMETER | HAT SIZE | INCHES |
|---|---|---|---|
| Youth S | 49-50 | 6 1/8 - 6 1/4 | 19 1/4 - 19 3/4 |
| Youth M | 51-52 | 6 3/8 - 6 1/2 | 20 - 20 1/2 |
| Youth L | 53-54 | 6 5/8 - 6 3/4 | 20 7/8 - 21 1/4 |
HJC CS-5N Size Chart
| XS | S | M | L | XL | 2XL | |
|---|---|---|---|---|---|---|
| Helmet Size (cm) | 54-55 | 55-56 | 57-58 | 58-59 | 60-61 | 62-63 |
| Cheek Pad (mm) | 45 | 40 | 35 | 40 | 35 | 30 |
| Liner Size (mm) | 15 | 12 | 9 | 15 | 12 | 9 |
G Force Sizing:
| Helmet Size | Centimeter |
| 2XS | 51-52 |
| XS | 53-54 |
| S | 55-56 |
| M | 57-58 |
| L | 59-60 |
| XL | 61-62 |
| 2XL | 63 |
| 2XL | 63+ |
Pyrotect Sizing:
Helmet Size | Inches | Hat Size | Centimeters |
Junior- XXXS, XXXS, XS | 19 1/4 - 20 1/8 | 6 - 6 1/4 | 49-51 |
XX Small | 20 - 21 1/4 | 6 3/8 - 6 1/2 | 51-52 |
X Small | 20 3/8 - 21 1/8 | 6 5/8 - 6 3/4 | 52-54 |
Small | 21 1/4 - 22 | 6 3/4 - 7 1/8 | 55-56 |
Medium | 22 1/2 - 22 7/8 | 7 1/8 - 7 1/4 | 57-58 |
Large | 23 1/4 - 23 5/8 | 7 3/8 - 7 1/2 | 58-60 |
X Large | 24 - 24 3/8 | 7 1/2 - 7 3/4 | 61-62 |
XX Large | 24 3/4 - 25 1/8 | 7 3/4 - 8 | 63-64 |
XXX Large | 25 1/4 - 25 1/2 | 8 1/4 - 8 1/2 | 65-66 |
Check out our YouTube video here
We recommend using our Line Driver to amplify music into your intercom system. We do not recommend charging your music device while playing music as it introduces power noise into the system. If you must charge the device during playback, we have two options: Purchase a ground isolator for the Line Driver; or use a battery powered amplifier such as a Boostaroo, which can be found on Amazon for around $50. They aren’t as high quality as our Line Driver, but they use a battery for power instead of vehicle power, eliminating noise possibilities.
We recommend using RCA cables or a 3 conductor input from your stereo to your intercom. Most stereo installations will also need a ground isolator to help reduce power noise from your stereo.
Keep in mind that thick phone covers and any aluminum or other metal covers will greatly reduce bluetooth signal range. If you can't part with your favorite phone cover or you have a thick metal dash, you can add an external antenna to your intercom box to increase range.
If an intercom or radio needs repair, the device must be removed from the vehicle and sent into PCI for repair. 99 times out of 100, the intercom/radio problem is actually an improper installation. Unfortunately, we do not have the space available to offer installation onsite. We encourage you to read these instructions and make sure your equipment is properly installed. Technical support over the phone is available free of charge. If you still cannot find the issue and would like to bring the vehicle in, we can schedule an appointment to help you. Technical service is available for $80 per hour.
Can be found here
The PCI Polaris Comlink RTX Radio does not require an FCC license to operate. It operates in the MURS band.
All other two-way radios require an FCC license to operate. PCI is not a frequency coordinator. We recommend using Forest Industries Telecommunications and they have set up a portal to obtain a license here. A VHF Mobile user with a Nationwide License is approximately $345 and lead time is 1-2 weeks. For more information, call us at 800-869-5636.
Technically, yes. We strongly discourage you programming your own radios. At Battle at Primm this year, we had a race truck unable to transmit when an ambitious team member reprogrammed the radio and removed the external PTT functionality. We also have several racers that change their band from wide to narrow thinking its a simple switch of a button. The radio MUST be tuned on a service monitor after this change.
Frequency changes and tuning are a free PCI service at races, play it safe and have the pros do it. If you must do it on your own, call us an ask for some (free!) help. ALWAYS read the radio, make your changes (to the frequencies only) and then write. Never start with a blank canvas.
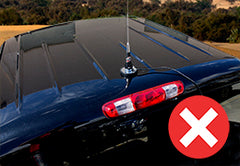
Mounting your antenna properly determines the range of your two-way radio. A metal roof with an antenna mounted in the center with no obstructions (roof rack, light bar) 18" in every direction provides the farthest range.
Roof Racks - Mount the antenna at the highest point of the rack. Use a no ground plane antenna.
No Roof - Pick a spot in the middle of the car. The intersection of two tubes can also act as a ground plane. Mounting the antenna to a corner triangle tab and using a no ground plane antenna will work best.
Do not run radio coax and intercom helmet cables in the same wire loom. RF can bleed over when transmitting, putting noise into the system. Never run coax or power cables near MSD or igniton equipment. They create noise and if the coax is too close to the MSD, transmitting can even power the vehicle off!
When tie wrapping the coax to the frame, do not crush the coax. If your coax looks flattened, kinked, frayed, or worn, replace it!
January 1st, 2013 - FCC Narrowbanding takes effect. PCI will narrowband your PCI radios free of charge, please stop by at a race, or ship your radios to us.
Motor homes are one of the toughest vehicles to put a antenna on and they are always different depending on what the vehicle is made out of and how close the radio is mounted in comparison to the antenna. We like to keep the coax length at 17' or less, but can go to a maximum of 24' with a standard flexible coax. Longer lengths require special low loss coax cable and special ends that have to be custom made.
When deciding where to put your radio keep these lengths in mind. If there is a way to mount radio overhead in the cab, the coax will be much shorter and give you more options for mounting.
What is your roof made of? If aluminum, a hole mount coax can be mounted directly to the top of the unit and has o-ring for rain seal. If the unit has a rubber roof, most mount a steel plate (that is powder coated so it does not rust) to the roof. Then you could use a magnetic mount coax. You could run the coax through a vent or use the rubber adhesive similar to what they do with Sat antenna for TV to penetrate the roof. A little silicone under the steel plate will make it a permanent fixture of the Motorhome.
The antenna should be at least 2' away from any air conditioners, or Satellite Dishes. We recommend a 1/4 wave or short antenna so it clears underpasses and bridges going down the freeway at speed.
VHF antennas cannot be mounted on the mirror or side of vehicle, they have to be on top of the vehicle for proper range.
The power is grounded through the radio but when the coax is touching metal (aluminum, steel or even carbon fiber) it also helps to create a ground plane from the metallic surface/roof - increasing your radio range.
If mounting to a plastic or fiberglass roof and there are no intersecting metal bars, using tin tape in a 36” cross will help push the antenna signal up and out instead of down and into the car, causing interference and reduced radio range.
The UV-5R and T55 are programmed with PCI's stock BaoFeng list. Add your own frequencies by following this simple guide.
Our stock list can be found here
If we programmed a custom list for you, please contact us and we will send your frequencies.
There are a lot of technical details we could get into, but long story short - UHF is a “better” signal. Ultra High Frequencies (UHF) penetrate obstructions such as buildings, wood, steel and concrete better than Very High Frequencies (VHF). However, UHF signals do not travel as far as VHF signals do. VHF also curve around the earth better for long distance, outdoor and hilly terrain. We recommend UHF for Closed Course racing and Business solutions. All Desert Racing should use VHF.
The VHF band range is 150Mhz to 174Mhz. UHF is 400Mhz to 512Mhz. VHF and UHF radios cannot be programmed to talk to each other. Desert teams can use VHF radios for desert and short course, but the ideal scenario would be to have UHF radios for short course and a separate set of VHF radios for the desert.
Power the radio on and press P0. A number will show on the screen showing the Squelch adjustment 0 to 9.
At 0, your squelch is wide open and you will hear static. This is also when your radio is most sensitive and you may be able to hear farther transmissions if someone is just out of reach.
Setting 1-3 are very sensitive and you will hear static constantly.
4-6 is the recommended area we suggest for recreation and will allow for good range with less static.
7-9 will drastically cut your range. If there is another group 5-10 miles away that you don't want to hear and your group is less than 5 miles, you could adjust your squelch to this range to remove that interference.
Click HERE to fill out a form and register your frequency with PCI.
Head and Neck Restraints (FHR/HNR) devices are date stamped on the SFI tag. They need to be recertified every five years. Necksgen charges $15, Simpson charges $25 for recertification only, repairs or replacement items may be extra. Please contact the below manufacturers directly to have your device recertified.
Necksgen - (619) 328-0410 - 1176 Greenfield Drive, El Cajon, CA 92021www.necksgen.com
Simpson/Safety Solutions Hybrid Models - (800) 473-7077 - 185 Rolling Hills Road, Mooresville, NC 28117 www.teamsimpson.com
Simpson/HANS - (800) 654-7223 - 328 GM 306 New Braunfels, TX 78130 www.teamsimpson.com
The PCI Weatherman relay channel is very busy information stream on race day. We are communicating with dozens of people at any given time and air time is valuable, especially in an emergency. Understanding how to properly and efficiently use the radio will help all of us have better communications. Please share with your team.
- The primary goal, focus and responsibility of the Weatherman Relay Team on race day is the safety of the racers and chase teams - NOT status reports.
- If the channel is CODE RED - there is a medical emergency. Do not request status, updates or relay on this channel, it will be for medical emergencies only until Weatherman clears the Code Red. If you are a PCI customer you can call for non emergency assistance on the PCI Customer Relay channel.
- Status requests are limited to overdue vehicles. Prepare your chase teams so they have an estimated time you should arrive to their location. Please do not call for status unless your vehicle is more than an hour overdue. If you do call in for a status, stick around. It may take some time to get back to you depending on workload, but it's a waste of time for us to keep you in queue if you are going to just switch back to your channel. Invest in a hand held or second radio to monitor Weatherman if you only have one radio to wait and listen for your team.
- LISTEN before you speak. When you tune to a channel, listen for at least one minute to make sure you are not interrupting any conversations. If you know it is clear, know what you are going to say, press the PTT, wait two seconds, say the name of who you are calling, say who you are, then say what you need.
- This is an example of an efficient conversation on race day. “Weatherman, copy 55 Chase?” “55 Chase, Weatherman, go ahead” “Weatherman, 55 Chase, can you relay to our race truck on 151.490 that we are en route with a transmission?” “55 Chase, Weatherman, copy relay on 151.490 that you are en route with transmission.”
- Keep it short and simple and think before you speak. If you get nervous on the radio, say what you are going to say out loud before you press the PTT.
- Slow down. Yelling or speaking fast on the radio won’t do anyone favors.
- Identify yourself. When making a radio transmission, begin with who you are looking for, then who you are. Weatherman communicates with thousands of people on race day. We hear "Weatherman, do you copy" all the time on race day and it makes communications difficult and inefficient.
- If you don’t hear back after two tries, you have two options. You can call out what you need in the dark or you can wait a few minutes and try again. Don’t be the idiot that is out there calling for someone relentlessly.
- If you are out of the race, the emergency has ended. Let people that need air time have it. Wait for lulls or breaks to coordinate your retrieval efforts. DNF’s should never be talking over those still in the race. Put yourself in their shoes.
- Just like your normal conversations, you cannot talk and listen at the same time. Don’t interrupt, they won’t hear you.
- Stuck Mic. It does no good to get on the radio and tell someone about it. When a radio is transmitting, they cannot hear you.
- If you don’t need to be on the radio, don’t be.
- If you’re just listening, unplug your mic and make sure you don’t sit on your hand held or put it in your pocket and key up the mic. PCI has magnetic microphone hang up clips that work great for chase trucks. If you've never listened to the Weatherman Relay stream online on race day, do it. There are dozens of "stuck mic" issues where a microphone is inadvertently keyed, ruining emergency communications for those in need. Make sure you stress how important this is to your teams - you could save a life.
- Know your frequency. Channel 7 is not your frequency. Be ready to tell Weatherman you need a relay on 151.625 to your chase crew.
Most people don't know, but microphone placement is one of the single most important components of your communication system. At PCI, we use noise canceling microphones that are specially designed to pick up your voice - not your engine, wind or shock noise. For the microphone to best determine what noise is what, the mic literally needs to be touching your lips. If you are having a hard time hearing anyone over the radio, ask them "how far away from your lips is that microphone?" If their answer isn't, "It's touching my lips!" then it is too far. When a co-driver has a microphone that is too far from their mouth, drivers will often turn up their volume, introducing other noise into the intercom system.
Always have the microphone centered left to right and top to bottom directly in front of your mouth and project your voice directly at the microphone. This is even more important for soft spoken people and children. DON'T YELL! You should never have to yell into your microphone, in fact yelling or excitement often makes you even harder to understand. Try to remain calm (which can be tough in a race environment), relax, take a deep breath, know what you want to say before you begin speaking, and clearly talk out, directly into the microphone.
These tips apply to anyone with a helmet or headset, get some mic socks and get comfy with your microphone - it will make the person on the other end of the radio a much happier person!
 |  |  |
 |  |  |
Most people don't know, but microphone placement is one of the single most important components of your communication system. At PCI, we use noise canceling microphones that are specially designed to pick up your voice - not your engine, wind or shock noise. For the microphone to best determine what noise is what, the mic literally needs to be touching your lips. If you are having a hard time hearing anyone over the radio, ask them "how far away from your lips is that microphone?" If their answer isn't, "It's touching my lips!" then it is too far. When a co-driver has a microphone that is too far from their mouth, drivers will often turn up their volume, introducing other noise into the intercom system.
Always have the microphone centered left to right and top to bottom directly in front of your mouth and project your voice directly at the microphone. This is even more important for soft spoken people and children. DON'T YELL! You should never have to yell into your microphone, in fact yelling or excitement often makes you even harder to understand. Try to remain calm (which can be tough in a race environment), relax, take a deep breath, know what you want to say before you begin speaking, and clearly talk out, directly into the microphone.
These tips apply to anyone with a helmet or headset, get some mic socks and get comfy with your microphone - it will make the person on the other end of the radio a much happier person!
| | |
| | |
A bad coaxial cable or an improperly mounted antenna can restrict two-way radio range from miles to feet.
Mounting your antenna properly determines the range of your two-way radios. Radios transmit the most range with a ground plane and our 3db gain racing antenna. An aluminum roof with an antenna mounted in the center - with no obstructions (roof rack, light bar) 18" in every direction will provide the farthest range.
If you have a roof rack, light bar, you are mounting to a tube or roll cage and will not have a "ground plane" for your antenna - you need to exchange your 3db gain racing antenna for a "No Ground Plane Antenna."
If you have a roof rack - always mount your antenna at the highest point of the roof rack and use our No Ground Plane Antenna.
No Roof? Pick a spot in the middle of the vehicle. The intersection of tubing can help act as a ground plane. Mounting the antenna to a corner triangle tab, using our No Ground Plane antenna will work best.
Do not run radio coax and intercom helmet cables in the same wire loom. RF can bleed over when transmitting, putting noise into the system. Never run coax or radio power cables near MSD or other ignition equipment. They create noise! If the coax is close to the MSD, the RF bleed can be so powerful it can actually turn the vehicle off!
When tie wrapping the coax to the frame, be gentle! Do not crush the coax. If your coax looks flattened, kinked, frayed or worn, replace it. A $29.95 part can ruin thousands of dollars you have invested in a great communications system.
 |  |
 |  |